How to Clean Moss from Roof Safely and Effectively in 2026
Knowing how to clean moss from roof surfaces matters for your home’s structural integrity and helps prevent expensive damage. Moss might appear harmless, but it traps moisture against your roof tiles. This leads to deterioration, leaks, and reduced lifespan of your roofing materials. In fact, removing moss requires the right techniques, safety measures, and cleaning solutions to get results without causing further harm.
This complete guide walks you through everything about moss removal. You’ll learn why moss grows and how to prepare for safe cleaning. We’ll share step-by-step methods for cleaning roof tiles the right way. Prevention strategies to keep your roof moss-free for years will also be covered.
Understanding Moss Growth on Your Roof
What Causes Moss to Grow on Roofs
Moss spreads through spores released into the air. These spores settle on roof surfaces and take root when conditions prove favourable. The main culprits are moisture and shade. Roofs exposed to rain or dew, especially when they take extended periods to dry out, create the perfect breeding ground for moss spores to germinate and flourish.
North-facing sections of your roof face the highest risk. They receive minimal sunlight throughout the day. This reduced sun exposure prevents proper drying and maintains the damp conditions moss requires. Overhanging trees compound the problem by providing shade and trapping moisture from rainfall.
Your roof tile’s material plays a most important role. Clay and concrete tiles are susceptible due to their porous surfaces, which absorb and retain moisture. Roofing materials become rougher and more porous as they age. This gives moss spores better grip and more opportunities to spread. Poor ventilation in your attic can also trap moisture in roofing materials and create an ideal environment for moss establishment.
Signs Your Roof Has a Moss Problem
Catching moss growth early saves considerable expense. You’ll notice small, light green specks appearing on shaded or damp areas of your roof in the early stage. These specks may look like simple discolouration or dirt, but they signal the beginning of colonisation.
These specks grow into more prominent patches with a thicker, fuzzy texture as moss develops. You might observe parts of your roof that never seem to dry, even days after rainfall. Moss is holding moisture against the shingles if accessible areas feel soft or spongy when walked on.
Advanced moss growth forms thick, spongy mats that cover much of your roof. Check your gutters during cleaning. Excessive grit or granules collecting there indicates moss is damaging your roof’s protective layers. Small, fuzzy patches appearing between shingles often go overlooked. They expand faster and lift tiles as they grow.
Damage Moss Can Cause to Your Roof
Moss functions like a sponge. It absorbs and retains water against your roof surface. This constant dampness degrades roofing materials and leads to premature wear and shortened lifespan. The moisture trapped by moss can cause wood rot in your roof’s timber structure and compromise insulation effectiveness. This results in higher energy bills.
Moss penetrates between and underneath tiles or shingles as it expands. This loosens and lifts them. Gaps form where water seeps beneath the roofing material and makes your roof vulnerable to leaks and water damage. Lifted shingles also become more susceptible to wind damage during storms.
Moss runoff clogs gutters and downspouts. This leads to water overflow that damages your home’s exterior walls and foundation. Dried moss and accumulated debris on roofs present a fire hazard. They can ignite if embers from wildfires or other sources land on them.
Safety Preparation and Equipment You’ll Need
Preparation separates safe, effective cleaning from disaster before you tackle moss removal. Heights carry real risks. Falls from roofs rank among the leading causes of DIY injuries.
Essential Safety Gear for Roof Cleaning
You need safety harnesses when working on roofs. A fall arrest system with harness and roof anchors prevents fatal falls. Non-slip footwear provides traction on wet, moss-covered surfaces. Hard hats protect against falling debris.
Eye protection is vital when you apply cleaning solutions or use equipment that might cause debris to fly. Safety goggles or face shields guard against chemical splashes and flying particles. Wear chemical-resistant gloves and a vapour-resistant mask with philtre when handling moss killers and biocides. This prevents skin contact and inhalation. Professional-grade treatments require full PPE. This has impermeable gloves, chemical-resistant clothing and a full face shield.
Tools and Cleaning Products Required
Ground-based roof scrapers are the safest approach. You can clean from scaffolding or ground level without climbing onto the roof. A sturdy, extendable ladder with stabilisers provides access when needed. Soft-bristled brushes prevent damage to tiles. Garden hoses rinse away loosened moss.
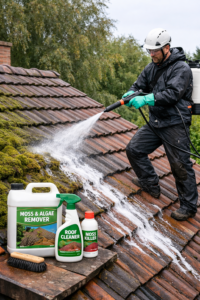
Specialist biocides kill moss spores and prevent regrowth better than household alternatives. Application equipment has spray bottles or watering cans for smaller areas. Larger projects may require professional-grade pump sprayers.
When to Hire a Professional Instead
Professional roof cleaners bring trained expertise, specialised equipment and liability insurance. They use soft washing techniques that protect tile integrity and eliminate growth at the root. Professionals eliminate the safety risks DIY methods present if your roof is steep, multi-storey or shows signs of structural damage. Their fall protection systems, proper training and experience working with different roof materials make them the sensible choice for challenging projects.
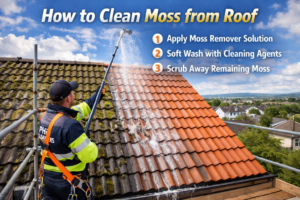
Step-by-Step Guide: How to Clean Moss from Roof
Removing moss from your roof just needs methodical execution. Each technique suits different scenarios, moss severity levels and roofing materials.
Method 1: Manual Removal with a Brush
You should scrape moss with a soft-bristle brush or plastic scraper. Work from the ridge downwards to prevent lifting tiles. Metal tools scratch and break tiles, so avoid them. Clear large clumps first with a trowel and collect debris in buckets to prevent gutter blockages. Wet the mossy areas with a garden hose on low pressure before brushing. This makes removal easier and prevents spore dispersal.
Method 2: Using Chemical Moss Killers
You can apply moss-killing solutions containing zinc sulphate or potassium salts with a garden sprayer on dry, calm days. The product should sit for 15-30 minutes as recommended. Rinse with water to wash away dead moss. Cover surrounding plants before spraying since these chemicals harm vegetation[152].
Method 3: Pressure Washing Your Roof
Low-pressure settings work best. Keep the nozzle at least 12 inches from tiles. High pressure strips protective granules and forces water underneath tiles. This causes serious damage. Work from top down. This method suits professionals who understand correct techniques.
Method 4: Natural Cleaning Solutions
White vinegar and water mixed in equal parts can be applied to moss. Leave it for several hours before scrubbing. You can also sprinkle baking soda over damp moss and let it sit for days before brushing.
Best Time of Year to Clean Moss
Late spring through early autumn, May to September, provides optimal conditions. Dry spells last longer and temperatures stay warmer. Roofs dry faster during these months.
Preventing Moss from Growing Back
Once you’ve cleared moss from your roof, prevention becomes paramount. Multiple strategies work together and keep surfaces clean longer.
Install Zinc or Copper Strips
Metal strips installed near your roof ridge release ions as rainwater flows over them. This inhibits moss growth below. Install zinc strips under ridge caps on both sides and make sure they protrude slightly to contact water. Each strip protects about 15 feet down the roof slope. Roofs extending beyond this distance need additional horizontal strips midway down.
Zinc strips last 20 years or more if installed correctly. Copper offers superior coverage and reaches 15-20 feet with more potent ion release. Both metals work best on smooth roof profiles with steeper pitches. Install strips at least 15 centimetres wide to get the best results.
Trim Overhanging Tree Branches
Keep a gap of 6-10 feet between branches and your roofline. This distance reduces shade and prevents debris accumulation that traps moisture. Trim branches back at least one metre from the roof. This speeds drying after rainfall.
Improve Roof Drainage and Ventilation
Clear gutters twice yearly, in spring and autumn, to prevent water pooling. Make sure soffit vents remain unobstructed and think about adding tile vents if you’ve converted your loft. Proper attic ventilation regulates moisture levels and reduces condensation on roof surfaces.
Regular Roof Maintenance Schedule
Clean roofs every 1-2 years in moderate conditions. Homes in damp climates or surrounded by trees need annual cleaning. Schedule inspections after storms to remove debris quickly.
Conclusion
Moss removal protects your roof’s integrity and prevents costly repairs down the line. We’ve covered multiple cleaning methods, from manual brushing to chemical treatments, each suited to different situations. Prevention proves easier than removal, so install zinc strips and trim overhanging branches while maintaining good drainage. Regular inspections every one to two years keep your roof moss-free. Choose the technique that matches your comfort level, or hire professionals when projects get challenging.