How to Clean Roof Tiles Safely | Remove Moss & Algae

How to Clean Roof Tiles Safely Without Causing Damage
how to clean roof tiles

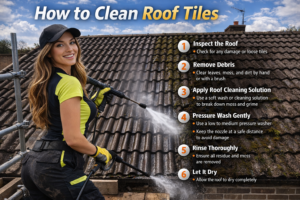
Roof tiles accumulate dirt, moss, and algae over time. Knowing how to clean roof tiles helps you avoid damage that can get pricey. Many homeowners worry about cracking tiles or creating leaks when they attempt to restore their roof’s appearance. Using the wrong techniques or harsh pressure washing can strip protective coatings and weaken the tiles themselves.

We’ve created this complete guide to help you clean your roof in a safe and effective manner. You’ll find how to clean roof tiles without pressure washer, how to clean roof tiles of moss using gentle methods, and how to clean roof tiles before painting to ensure the paint adheres well. We’ll walk you through safety precautions and the right tools and materials. You’ll also learn step-by-step cleaning methods and preventative measures that keep your roof tiles in excellent condition for years.

Safety Precautions Before You Start Cleaning

Assess Your Roof Condition First

Walk around your property before you begin cleaning. Look at the roof from ground level. Look for signs of moss, algae and lichen growth. These hold moisture against the surface and deteriorate tiles over time. Check for missing, cracked or curling tiles that show existing damage. These issues prevent adequate protection and allow water penetration. This leads to rot and mould growth.

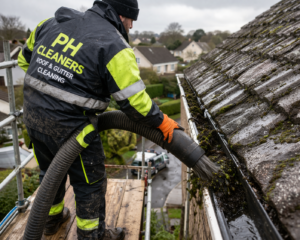
Look for accumulated debris such as leaves and twigs. They trap moisture and create ideal conditions for further deterioration. Repair takes priority over cleaning if your roof covering appears aged, brittle or shows signs of active leaking. We recommend having your roof inspected twice per year at minimum. Spring and autumn are ideal times, along with periods following major storms.

Safety Equipment You Need

Working at height poses real danger. Falls rank among the most common causes of roofing injuries. You need proper fall protection equipment before attempting any roof work.

A complete safety kit has a harness and fall arrest system with secure anchor points. The 3M Protecta Fall Protection Roofers Set provides a harness, anchor, rope grab with lanyard and 10-metre lifeline. All are designed for a weight capacity of 140 kilogrammes. You also need a sturdy ladder placed on flat, stable ground and secured before use.

Wear non-slip shoes with good grip. Wet surfaces turn slippery and dangerous. Protective equipment such as gloves and safety glasses shields you from debris and sharp objects. Roof anchors provide additional security points for your harness system on steep roofs.

Weather Conditions to Avoid

Never attempt roof cleaning during high winds, heavy rain or freezing conditions. Bad weather creates slippery, dangerous surfaces that multiply accident risk. Wet or icy roofs compromise footing and stability. Strong winds can cause loss of balance.

Early nightfall limits working time during winter months. Cold temperatures make materials more fragile. Plan your cleaning for dry, calm days with good visibility.

When to Call a Professional

Roof cleaning requires specialised training and equipment to traverse height risks safely. Professionals use safety harnesses the right way. They understand proper ladder techniques and handle steep slopes with experience. Hire a qualified specialist if you feel uncomfortable with heights or uncertain about the process. Professionals also assess your roof for damage during cleaning. They detect problems like loose tiles or damaged flashing early.

Tools and Materials for Safe Roof Tile Cleaning

Simple Cleaning Tools

The right tools prevent tile damage during the cleaning process. Soft-bristle brushes and brooms remove dirt and moss without scratching surfaces. A trowel works well to lift away dried moss and debris when you scrape manually, especially on dry days when materials aren’t stuck to tiles with moisture.

Telescopic poles extend your reach and keep you safely on the ground. The SkyScraper Roof Moss Remover by SkyVac eliminates the need to climb onto your roof. Wire brushes with carbon steel bristles access areas that blade systems cannot reach, such as edges and joins. The OVA8 Roof Scraper offers eight different blade profiles to match various tile shapes.

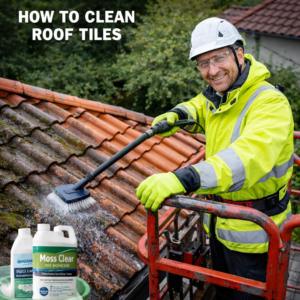
Low-pressure washers clean tiles without causing harm. High-pressure washing can crack tiles or dislodge them entirely. Professionals often use specialised low-pressure cleaning systems that ensure deep cleaning without compromising the roof’s integrity.

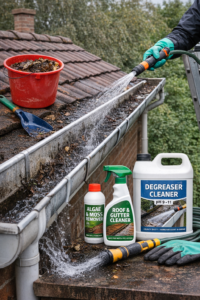
Cleaning Solutions That Won’t Damage Tiles

Choose biodegradable and non-toxic products that protect both your roof and surrounding plants. Roof-safe solutions should be non-acidic and non-bleach formulations labelled for pitched roofs. Bio Cleanze, diluted 25:1, targets moss and algae while remaining environmentally safe.

Roof Clean Xtreme combines four powerful active cleaning ingredients with a biocide to inhibit further growth and treats approximately 40 square metres per 5 litres. Clean & Protect Roofs functions as both a cleaner and sealer and continues to work for up to 5 years after application.

Equipment for Different Tile Types

Concrete and slate tiles require delicate approaches with stiff but soft-bristle brushes attached to telescopic poles. Artificial slates need gentle scraping to avoid damaging their fragile surfaces. Clay tiles benefit from fast-acting cleaners like Roof Clean Xtreme that work without intense pressure washing.

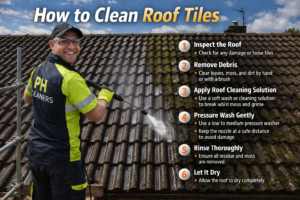
Step-by-Step Methods to Clean Roof Tiles Without Damaging Them

How to Clean Roof Tiles Without a Pressure Washer

You can clean roof tiles without high-pressure equipment using several methods. A leaf blower removes surface debris safely when your roof only has leaves, feathers and twigs without embedded grime. Soft brushing with a stiff-bristle brush removes most dirt from tile roofs when you scrub gently in sections for a more complete cleaning.

Steam cleaning provides a deep clean that pressure washers struggle to achieve on tile roofs safely. Zinc strips offer a passive cleaning solution. You install them at the roof’s peak and zinc particles run down tiles when it rains, cleaning without requiring ladders. Zinc oxide removes embedded filth from tile surfaces as an alternative.

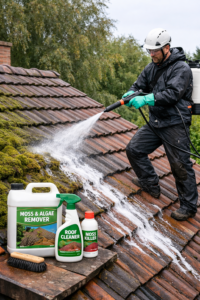
Using Low-Pressure Water Systems

Soft washing combines low-pressure water with specialised cleaning solutions and eliminates moss, algae and mildew without damaging tiles. True soft washing operates at 40-100 PSI (2.5-7 bar), safe for all roof tile types when paired with correct chemicals and dwell time. Standard jet washers remain too powerful even on low settings in contrast.

You apply eco-friendly cleaning solution evenly across the roof and allow it to penetrate for 10-15 minutes to loosen grime, then gently rinse with low-pressure water. Work downward from the top to prevent water getting trapped under tiles.

Manual Cleaning Techniques

A trowel removes buildup on dry days when moisture won’t cause dirt to stick. You scrub gently using circular motions with soft-bristled brushes to dislodge algae and stains, then rinse to prevent residue buildup.

Chemical Treatment Application

Biocide treatments use chemicals like Didecyl Dimethyl Ammonium Chloride and destroy bacteria, mould and algae. You apply biocide on bone-dry substrate and never wet tiles beforehand. Spray evenly across moss and focus on thickest areas, then let sit for recommended time before rinsing. Oxygen bleach treats organic stains with less harm than chlorine bleach. Test solutions on small, inconspicuous areas first.

How to Clean Roof Tiles of Moss and Other Common Problems

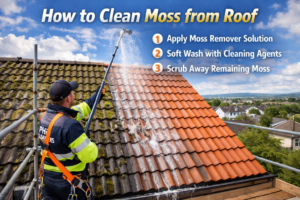
Removing Moss and Algae Safely

Moss on roof tiles is rarely a problem unless it blocks gutters, outlets and drainage points. But moss is porous and soaks up water like a sponge. It can lift and crack tiles while accelerating wear. Manual removal using a soft-bristle brush attached to a telescopic pole works for light to moderate growth. Brush down the roof slope, never upwards, to prevent lifting tiles. Apply specialist biocide like Benz Softwash after manual removal. The government has approved it and it kills spores to prevent regrowth. SmartSeal Xtreme works without scrubbing when mixed 1:1 with water for heavy moss and lichen.

Dealing with Stubborn Stains

Algae and fungal growth form a biofilm that bonds to tile surfaces and causes black staining. Low-pressure soft washing uses chemistry to break down organic growth at the root. It neutralises spores and prevents rapid regrowth. This method preserves tile coatings without relying on mechanical force. Adequate dwell time and correct dilution rates determine long-term results.

How to Clean Roof Tiles Before Painting

Remove all moss, algae, dirt and debris before painting to prevent interference with paint adhesion. Apply eco-friendly cleaning solutions to avoid harmful runoff. A well-cleaned roof boosts painting outcomes and extends paint longevity.

Preventing Future Growth

Install copper or zinc strips along the ridge line. These metals release ions that inhibit moss growth when it rains. Trim overhanging branches to increase sunlight exposure and improve airflow. Keep gutters clear to prevent water backing up onto roof edges. Apply protective sealers like SmartSeal Roof Tile Sealer. It creates a water repellent barrier and protects against green algae for over 10 years.

Conclusion

Clean roof tiles boost your home’s appearance and extend their lifespan. The methods that we’ve shared prioritise safety and effectiveness over harsh techniques that cause damage. You can choose manual scrubbing or soft washing, but what matters most is gentle application and proper equipment. Regular maintenance and preventative measures reduce future cleaning needs for the most part. Professional cleaners provide experienced solutions without the risk if you feel uncertain about working at height.

FAQs

Q1. Simplest method
Manual cleaning with a brush or trowel. Telescopic tools allow safe cleaning from the ground.


Q2. Vinegar use
Vinegar is safe, eco-friendly, and won’t damage tiles when used correctly.


Q3. Professional solutions
Professionals use soft wash chemicals with biocides or sometimes bleach-based solutions for tough stains.


Q4. Prevent moss
Use copper/zinc strips, trim branches, keep gutters clean, and apply sealers.


Q5. Pressure washing
High pressure can damage tiles. Use low pressure (40–100 PSI) instead.

how to clean roof tiles how to clean roof tiles

How to Clean Roof Gutters Safely | Step-by-Step Guide

How to Clean Roof Gutters Safely | Step-by-Step Guide

how to clean roof gutters

Clogged gutters can lead to water damage, foundation problems, and repairs that get pricey, yet many homeowners put off this maintenance task. Learning how to clean roof gutters turns this daunting chore into a manageable project you can tackle.

Gutter cleaning seems intimidating, but we’re here to show you it doesn’t have to be. We’ll walk you through the safety equipment you need, the tools required, and a step-by-step cleaning process in this piece. We’ll also cover methods for how to clean gutters without getting on roof and how to clean roof gutters without a ladder. You have options that suit your comfort level and situation.

Safety Equipment and Preparation Before Cleaning

Proper preparation separates a safe job from a potential risk when you attempt to clean roof gutters. Gather the right equipment and assess conditions to protect yourself from injury and make the whole process smoother.

Protective gear you need

Start with sturdy, slip-resistant shoes that provide good traction on ladder rungs. Wet surfaces can be treacherous, so footwear with gripping treads prevents slipping. Durable work gloves protect your hands from sharp metal edges, debris, and any animals or insects hiding in the gutters. Safety glasses or goggles shield your eyes from falling particles when you look up at overhead components. These simple items are the foundations of safe gutter maintenance and shouldn’t be skipped.

Ladder safety basics

The right ladder makes all the difference. We recommend extension ladders for both single-storey bungalows and two-storey houses rather than step ladders, which force you to stretch dangerously to one side. Your ladder must be rated for your weight plus additional load capacity.

Position your ladder using the 4-to-1 rule: for every four feet of height, place the base one foot away from the wall. This angle provides optimal stability. Never rest the ladder on the gutter, as uPVC guttering isn’t designed to support that weight. Use a ladder stand-off bracket instead that fits over the top two rungs and holds the ladder about 30cm from the wall. This accessory spreads the load and gives you better working position.

Weather conditions to check

Only clean gutters in clear, dry weather. Wind threatens ladder stability, whilst rain makes surfaces slippery and dangerous. Ensure your ladder is dry before climbing.

Ground-level gutter inspection

Walk around your property and examine the gutters from ground level before climbing. Look for visible damage, sagging sections, or areas where debris has accumulated heavily. This original assessment helps you plan your approach and identify potential problem areas.

Tools and Materials Required

The right tools reshape how you clean roof gutters and turn a frustrating ordeal into a simple task. You’ve already gathered your safety equipment. Now you’ll need specific cleaning implements to remove debris.

Simple cleaning tools

A gutter scoop serves as your main tool to remove leaves and debris. These scoops feature a curved design that fits the gutter profile and include drainage holes that let water pass through whilst retaining solid matter. Some homeowners fashion homemade versions from plastic milk jugs, though purpose-built scoops work better.

You’ll need a bucket with a carry handle to collect the debris you remove. A garden hose with a high-pressure nozzle flushes remaining dirt after scooping. Stubborn grime stuck to gutter surfaces requires a gutter brush with an extendable handle that scrubs away residue and cobwebs.

Optional equipment that makes cleaning easier

Telescopic gutter cleaning poles allow you to clean gutters without getting on roof and reach heights up to 12 metres from ground level. These poles use lightweight carbon fibre construction, with each 5-foot section that weighs around 350 grammes.

Gutter vacuum systems provide the quickest way to clean. These vacuums use strong suction to remove debris from ground level and eliminate ladder risks. Those who already own pressure washers can connect gutter cleaning attachments to their existing equipment. The Kärcher system uses a cleaning sled with backward-facing nozzles that propel it through gutters and flush debris.

What to avoid using

Never use garden rakes or shovels to clean gutters, as they damage guttering systems. Power tools require careful handling. Pressure washers and rotating agitators will ruin gutters if used without care. Avoid acidic cleaning chemicals that corrode gutter materials over time.

Step-by-Step Process to Clean Roof Gutters

Once you have your equipment and are ready, the actual cleaning process follows a step-by-step method that keeps you safe and ensures complete results.

Step 1: Position your ladder securely

Set up your ladder so the stabilisers rest above the gutter on the roof rather than on the guttering. Begin near a downspout, as this location provides a natural starting point for debris removal. Verify the ladder remains stable before climbing.

Step 2: Remove large debris by hand

Clear large debris such as leaves and twigs by hand with your gloves on. Place these materials into your bucket. This first pass removes the bulk of accumulated matter and prevents items from clogging your vacuum or scoop.

Step 3: Scoop out smaller debris

Use your gutter scoop or garden trowel to remove compacted debris that won’t come out by hand. Work along each section and scrape the bottom and sides of the gutter channel. Empty your scoop into the bucket often to maintain a clear working space.

Step 4: Flush gutters with water

Fit your garden hose with a spray nozzle and flush the remaining dirt from the gutters. Start at the far end and work towards the downspout. A strong stream clears lingering particles, but avoid spraying underneath roof shingles.

Step 5: Check and clear downspouts

Run water through the downspout to test flow. If water backs up into the gutter, you have a blockage. Try tapping on the downspout as you descend the ladder one rung at a time. Stubborn clogs may require a handheld auger fed into the downspout opening and turned clockwise.

Step 6: Inspect for damage or leaks

Check for standing water in the gutters once you finish cleaning. Gutters should slope 1/4-inch for every 10 feet towards the downspout. Examine seams and corners for leaks. Look for rust patches, sagging sections, or gutters pulling away from the roofline.

How to Clean Gutters Without Getting on Roof

Not everyone feels comfortable working at height, and you don’t need to climb onto your roof to maintain gutters. Several ground-level methods allow you to clean gutters without getting on roof and achieve professional results.

Using extension poles from the ground

Telescopic gutter cleaning poles extend up to 310 centimetres. This enables you to reach roof gutters from ground level. These systems feature curved brush heads with hard nylon bristles that reach difficult areas and remove leaves and debris from drainage systems. The 90-degree brush head design adapts to various heights and inaccessible spots. The adjustable length suits different cleaning environments. You work by extending the pole to match your gutter height. Move the brush head along the gutter channel to dislodge accumulated matter.

Gutter cleaning attachments for hoses

Pressure washer systems offer powerful cleaning from ground level. The Kärcher system uses a cleaning sled placed in the gutter and connected to your pressure washer with a 20-metre high-pressure hose. Two nozzles on the sled’s underside eject water backwards. This propels the sled forward and flushes debris. Garden hose attachments, known as gutter cleaning wands, connect to standard hoses and direct water flow to push debris towards downspouts. Water pressure dislodges stubborn dirt, making this method the quickest way to flush thoroughly.

Leaf blower method without a ladder

Leaf blower gutter kits transform your existing blower into a ground-level cleaning tool. Extension tubes attach to handheld blowers and extend beyond ten feet. This provides sufficient reach for most residential gutters. The EGO gutter attachment measures 8.3 feet in length with an adjustable nozzle. Worx kits offer 11-foot reach and weigh only 2.6 pounds. These work best on dry days, as wet debris sticks together and resists air flow. Wear goggles, as the blower throws debris into the air.

Conclusion

Gutter maintenance protects your home from water damage and repairs that get pricey. The task becomes straightforward once you have the right safety equipment and tools. You can climb a ladder or use ground-level methods. We’ve shown you multiple approaches that suit your comfort level. Choose the method that works best for your situation and make gutter cleaning part of your home maintenance routine to prevent future problems.

FAQs

Q1. Safety precautions
Wear non-slip shoes, gloves, and safety glasses. Work only in dry weather. Use a stable ladder (4:1 rule) and keep 3 points of contact. Avoid top 3 rungs.


Q2. Basic tools
Gutter scoop, bucket, garden hose with nozzle, and extendable brush for stubborn dirt.


Q3. Cleaning without ladder
Use telescopic poles, hose attachments, or leaf blower kits to clean safely from the ground.


Q4. Blocked downspout
Flush with water. If clogged, tap the pipe or use a drain auger to clear blockage.


Q5. What to avoid
Don’t use rakes or harsh chemicals. Be careful with pressure washers. Never place ladder on gutters.

how to clean roof gutters how to clean roof gutters how to clean roof gutters

How to Clean Moss from Roof

How to Clean Moss from Roof Safely and Effectively in 2026

how to clean moss from roof

Knowing how to clean moss from roof surfaces matters for your home’s structural integrity and helps prevent expensive damage. Moss might appear harmless, but it traps moisture against your roof tiles. This leads to deterioration, leaks, and reduced lifespan of your roofing materials. In fact, removing moss requires the right techniques, safety measures, and cleaning solutions to get results without causing further harm.

This complete guide walks you through everything about moss removal. You’ll learn why moss grows and how to prepare for safe cleaning. We’ll share step-by-step methods for cleaning roof tiles the right way. Prevention strategies to keep your roof moss-free for years will also be covered.

Understanding Moss Growth on Your Roof

What Causes Moss to Grow on Roofs

Moss spreads through spores released into the air. These spores settle on roof surfaces and take root when conditions prove favourable. The main culprits are moisture and shade. Roofs exposed to rain or dew, especially when they take extended periods to dry out, create the perfect breeding ground for moss spores to germinate and flourish.

North-facing sections of your roof face the highest risk. They receive minimal sunlight throughout the day. This reduced sun exposure prevents proper drying and maintains the damp conditions moss requires. Overhanging trees compound the problem by providing shade and trapping moisture from rainfall.

Your roof tile’s material plays a most important role. Clay and concrete tiles are susceptible due to their porous surfaces, which absorb and retain moisture. Roofing materials become rougher and more porous as they age. This gives moss spores better grip and more opportunities to spread. Poor ventilation in your attic can also trap moisture in roofing materials and create an ideal environment for moss establishment.

Signs Your Roof Has a Moss Problem

Catching moss growth early saves considerable expense. You’ll notice small, light green specks appearing on shaded or damp areas of your roof in the early stage. These specks may look like simple discolouration or dirt, but they signal the beginning of colonisation.

These specks grow into more prominent patches with a thicker, fuzzy texture as moss develops. You might observe parts of your roof that never seem to dry, even days after rainfall. Moss is holding moisture against the shingles if accessible areas feel soft or spongy when walked on.

Advanced moss growth forms thick, spongy mats that cover much of your roof. Check your gutters during cleaning. Excessive grit or granules collecting there indicates moss is damaging your roof’s protective layers. Small, fuzzy patches appearing between shingles often go overlooked. They expand faster and lift tiles as they grow.

Damage Moss Can Cause to Your Roof

Moss functions like a sponge. It absorbs and retains water against your roof surface. This constant dampness degrades roofing materials and leads to premature wear and shortened lifespan. The moisture trapped by moss can cause wood rot in your roof’s timber structure and compromise insulation effectiveness. This results in higher energy bills.

Moss penetrates between and underneath tiles or shingles as it expands. This loosens and lifts them. Gaps form where water seeps beneath the roofing material and makes your roof vulnerable to leaks and water damage. Lifted shingles also become more susceptible to wind damage during storms.

Moss runoff clogs gutters and downspouts. This leads to water overflow that damages your home’s exterior walls and foundation. Dried moss and accumulated debris on roofs present a fire hazard. They can ignite if embers from wildfires or other sources land on them.

Safety Preparation and Equipment You’ll Need

Preparation separates safe, effective cleaning from disaster before you tackle moss removal. Heights carry real risks. Falls from roofs rank among the leading causes of DIY injuries.

Essential Safety Gear for Roof Cleaning

You need safety harnesses when working on roofs. A fall arrest system with harness and roof anchors prevents fatal falls. Non-slip footwear provides traction on wet, moss-covered surfaces. Hard hats protect against falling debris.

Eye protection is vital when you apply cleaning solutions or use equipment that might cause debris to fly. Safety goggles or face shields guard against chemical splashes and flying particles. Wear chemical-resistant gloves and a vapour-resistant mask with philtre when handling moss killers and biocides. This prevents skin contact and inhalation. Professional-grade treatments require full PPE. This has impermeable gloves, chemical-resistant clothing and a full face shield.

Tools and Cleaning Products Required

Ground-based roof scrapers are the safest approach. You can clean from scaffolding or ground level without climbing onto the roof. A sturdy, extendable ladder with stabilisers provides access when needed. Soft-bristled brushes prevent damage to tiles. Garden hoses rinse away loosened moss.

Specialist biocides kill moss spores and prevent regrowth better than household alternatives. Application equipment has spray bottles or watering cans for smaller areas. Larger projects may require professional-grade pump sprayers.

When to Hire a Professional Instead

Professional roof cleaners bring trained expertise, specialised equipment and liability insurance. They use soft washing techniques that protect tile integrity and eliminate growth at the root. Professionals eliminate the safety risks DIY methods present if your roof is steep, multi-storey or shows signs of structural damage. Their fall protection systems, proper training and experience working with different roof materials make them the sensible choice for challenging projects.

Step-by-Step Guide: How to Clean Moss from Roof

Removing moss from your roof just needs methodical execution. Each technique suits different scenarios, moss severity levels and roofing materials.

Method 1: Manual Removal with a Brush

You should scrape moss with a soft-bristle brush or plastic scraper. Work from the ridge downwards to prevent lifting tiles. Metal tools scratch and break tiles, so avoid them. Clear large clumps first with a trowel and collect debris in buckets to prevent gutter blockages. Wet the mossy areas with a garden hose on low pressure before brushing. This makes removal easier and prevents spore dispersal.

Method 2: Using Chemical Moss Killers

You can apply moss-killing solutions containing zinc sulphate or potassium salts with a garden sprayer on dry, calm days. The product should sit for 15-30 minutes as recommended. Rinse with water to wash away dead moss. Cover surrounding plants before spraying since these chemicals harm vegetation[152].

Method 3: Pressure Washing Your Roof

Low-pressure settings work best. Keep the nozzle at least 12 inches from tiles. High pressure strips protective granules and forces water underneath tiles. This causes serious damage. Work from top down. This method suits professionals who understand correct techniques.

Method 4: Natural Cleaning Solutions

White vinegar and water mixed in equal parts can be applied to moss. Leave it for several hours before scrubbing. You can also sprinkle baking soda over damp moss and let it sit for days before brushing.

Best Time of Year to Clean Moss

Late spring through early autumn, May to September, provides optimal conditions. Dry spells last longer and temperatures stay warmer. Roofs dry faster during these months.

Preventing Moss from Growing Back

Once you’ve cleared moss from your roof, prevention becomes paramount. Multiple strategies work together and keep surfaces clean longer.

Install Zinc or Copper Strips

Metal strips installed near your roof ridge release ions as rainwater flows over them. This inhibits moss growth below. Install zinc strips under ridge caps on both sides and make sure they protrude slightly to contact water. Each strip protects about 15 feet down the roof slope. Roofs extending beyond this distance need additional horizontal strips midway down.

Zinc strips last 20 years or more if installed correctly. Copper offers superior coverage and reaches 15-20 feet with more potent ion release. Both metals work best on smooth roof profiles with steeper pitches. Install strips at least 15 centimetres wide to get the best results.

Trim Overhanging Tree Branches

Keep a gap of 6-10 feet between branches and your roofline. This distance reduces shade and prevents debris accumulation that traps moisture. Trim branches back at least one metre from the roof. This speeds drying after rainfall.

Improve Roof Drainage and Ventilation

Clear gutters twice yearly, in spring and autumn, to prevent water pooling. Make sure soffit vents remain unobstructed and think about adding tile vents if you’ve converted your loft. Proper attic ventilation regulates moisture levels and reduces condensation on roof surfaces.

Regular Roof Maintenance Schedule

Clean roofs every 1-2 years in moderate conditions. Homes in damp climates or surrounded by trees need annual cleaning. Schedule inspections after storms to remove debris quickly.

Conclusion

Moss removal protects your roof’s integrity and prevents costly repairs down the line. We’ve covered multiple cleaning methods, from manual brushing to chemical treatments, each suited to different situations. Prevention proves easier than removal, so install zinc strips and trim overhanging branches while maintaining good drainage. Regular inspections every one to two years keep your roof moss-free. Choose the technique that matches your comfort level, or hire professionals when projects get challenging.
how to clean moss from roof

Can you leave vanish carpet cleaner on overnight​?

can you use vanish carpet cleaner on sofa

 when they want to restore their carpets. Extended application might seem like a logical solution for deep-set stains, but the answer isn’t straightforward. Several factors come into play.

You need to use Vanish carpet stain remover the right way to achieve the best results. This piece will explore manufacturer recommendations and get into whether you can use Vanish carpet cleaner on clothes or sofas. We’ll clarify if it contains bleach and help you determine the safest approach for your cleaning needs that works.

Can You Leave Vanish Carpet Cleaner on Overnight?

What the Manufacturer Recommends

The manufacturer’s instructions are clear and specific on this matter. Vanish recommends leaving the foam on your carpet for 2 hours or until dry. You then need to vacuum it up. This timeframe applies to their carpet deep cleaning foam products and represents the optimal dwell time for the formula to work without causing potential risks.

The recommended process involves shaking the can well and spraying the foam onto the carpet. Work it in with a colourfast brush or clean damp mop and wait the specified period. This two-hour window allows the active ingredients to break down dirt and stains as the foam dries. You vacuum up the residue along with the loosened dirt once it’s dry.

Leaving Vanish carpet cleaner on overnight exceeds the manufacturer’s guidelines by a lot. The product wasn’t created for extended exposure beyond the recommended timeframe. This creates uncertainty about how it will perform or affect your carpet fibres after 8-12 hours of contact.

Risks of Leaving Vanish on Too Long

Extended application beyond the recommended 2 hours can lead to several complications. The cleaning agents may over-saturate carpet fibres and cause discolouration or texture changes. Residue buildup becomes another concern when the product sits too long. It can attract more dirt once you start using the carpet again.

Carpet backing and padding may also absorb excessive moisture during prolonged contact. This creates an environment where mould and mildew can develop, especially if your room lacks proper ventilation. The longer the product sits, the harder it becomes to remove during vacuuming.

When Extended Application Might Be Necessary

Extended application rarely proves necessary with Vanish products. The 2-hour window provides sufficient time for the formula to work on most stains. If a stain persists after the first treatment, applying a second round following the proper timing delivers better results than leaving the product on overnight.

You can treat the area multiple times with the correct dwell time between applications for stubborn stains. This approach respects the product’s formulation and gives tough stains the attention they need.

How to Use Vanish Carpet Stain Remover Properly

Step-by-Step Application Process

Vacuum the carpet really well before you apply any Vanish product. This removes loose dirt and debris and prevents you from pushing dirt deeper into the fibres during cleaning.

Remove excess dirt and open the nozzle for the spray application. Spray the product onto the stain area and rub in with a clean cloth. Leave the solution to soak in for up to 5 minutes, then blot the stain and remove excess product. Repeat these steps if you’re dealing with especially tough or dried-in stains.

The shampoo method requires mixing 1 part Vanish 3-in-1 Carpet & Upholstery Shampoo with 9 parts cool water (maximum temperature 40°C). Whisk the solution into a foam, then apply the foam using a clean colourfast brush or sponge. Avoid making the carpet overly wet. Vacuum away the residue once it dries.

Recommended Dwell Time for Different Stains

Different Vanish products require specific dwell times. The spray formulation needs a maximum of 5 minutes to work[61]. This short timeframe allows the oxygen-based formula to break down stains without over-saturating the carpet.

Foam products need about 2 hours or until they dry. The powder version requires about 20 minutes of dwell time. Vacuum the area after this period to remove all residue.

Blotting and Rinsing Techniques

Blotting is the single most important technique when using Vanish. Start from the outside edges of the stain and work inward. This containment method prevents the stain from spreading across a larger area.

Use gentle pressure with a clean white cloth. Rubbing causes particles to get ground into carpet fibres and leads to premature breakdown. Rinse the area with clean water after treatment and blot dry to remove any leftover cleaning solution. Residue left behind can attract more dirt over time.

Common Mistakes to Avoid

Over-wetting ranks as the main error. You can wet the backing if you soak the carpet, and this leads to musty smells that are harder to eliminate than the original stain. Keep the carpet damp, not drenched.

You leave residue that attracts additional dirt if you forget to vacuum after the area has dried. Always perform a final vacuum once the treated area dries.

Does Vanish Carpet Cleaner Work on Other Surfaces?

Can You Use Vanish Carpet Cleaner on Clothes?

This question stems from understandable confusion about Vanish’s product range. The answer is no. You cannot use Vanish stain remover products designed for laundry on carpets. You also shouldn’t use Vanish carpet cleaners in your washing machine or directly on clothing.

The Vanish In-wash range is created for fabrics in your laundry. These products work differently than carpet cleaners and contain ingredients optimised for washable textiles. Stick to Vanish products marked for laundry use if you want to treat clothing stains. You need the Vanish Carpet & Upholstery range for carpets and upholstery.

Testing any product on an inconspicuous spot before full application prevents potential colour bleeding or damage. This applies whether you’re treating carpets or fabrics.

Can You Use Vanish Carpet Cleaner on Sofa?

Yes, Vanish carpet cleaners work on sofas. The product targets and removes stains from both carpet and upholstery. This dual functionality makes it suitable for rugs, sofas and other upholstered furniture in your home.

The formula removes various stains including red wine, tea, ink, mud and grass from upholstery. It softens, freshens and cleans whilst removing dirt and pet hair.

Other Surfaces Vanish Can Clean

Vanish carpet cleaner works on multiple upholstered surfaces beyond carpets and sofas. Rugs benefit from the same stain-fighting formula. The product removes stains from carpets and upholstery including pet messes, making it useful for homes with animals.

The cleaning solution brings stain removal power that removes stubborn spots from your upholstery. The product remains limited to carpets and upholstered items, though. It’s not designed for hard surfaces, clothing or other materials outside its intended use.

Understanding Vanish Carpet Cleaner Ingredients and Safety

Does Vanish Carpet Cleaner Contain Bleach?

Vanish carpet cleaners are free from chlorine bleach. But they do have oxygen-based bleaching agents at concentrations below 5%. This difference matters because oxygen-based bleaches work differently than chlorine bleach and break down stains without the harsh effects that traditional bleach products cause.

The formula also has anionic surfactants, non-ionic surfactants, polycarboxylates and perfume, all at concentrations below 5%. Some variants have aliphatic hydrocarbons and phosphates.

Is Vanish Safe for All Carpet Types?

Vanish isn’t suitable for every carpet type. You should not use the product on silk or oriental rugs. Avoid using it on velvet materials, brocade or fabrics unsuitable for wet cleaning.

Pet and Child Safety Considerations

Keep children and pets off the carpet while using Vanish and during hoovering. The product must remain out of reach from children and pets at all times. Wearing gloves is recommended for sensitive skin.

What to Do If You’ve Left Vanish on Too Long

Rinse the area with clean water and blot dry if you’ve exceeded the recommended time. Rinse with plenty of water should the product get into eyes. Flush with water for skin contact. Seek medical attention if swallowed.

Conclusion

Leaving Vanish carpet cleaner on overnight isn’t worth the risk. The two-hour window the manufacturer recommends delivers results that work without damaging your carpets or creating residue buildup. If stubborn stains persist after the first treatment, apply a second round with proper timing rather than extending exposure. Test on an inconspicuous area first and stick to carpet and upholstery surfaces only. Follow the blotting techniques we’ve outlined for the best results.

can you use vanish carpet cleaner on clothes​can you leave vanish carpet cleaner on overnight​

Open chat
Hello this is Remy👋
Can we help you?