How to Get Rid of Mould on Ceiling: Effective Solutions

How to Get Rid of Mould on Ceiling: A Complete Guide

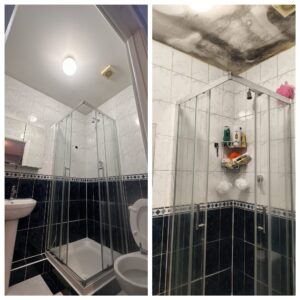
Mould on the ceiling is a common problem in many homes, and it can be both unsightly and harmful to your health. If left unchecked, it can spread quickly, causing damage to the ceiling and potentially worsening air quality. Understanding the causes of ceiling mould is the first step in getting rid of it and preventing it from coming back.

Understanding the Causes of Ceiling Mould

Mould on ceilings typically grows due to excess moisture and poor ventilation. Common triggers include condensation from steamy bathrooms or kitchens, roof leaks, and inadequate airflow in closed spaces like basements or attics. Here are some of the most common causes of ceiling mould:

  1. Excess Moisture: Areas that retain moisture, such as bathrooms and kitchens, are prime candidates for mould growth. When moisture accumulates on the ceiling, it creates the perfect environment for mould spores to thrive.

  2. Poor Ventilation: Without proper airflow, humid air tends to settle on the ceiling, especially in rooms that generate a lot of moisture, like bathrooms or kitchens. Poor ventilation allows that moisture to stay trapped, encouraging mould growth.

  3. Roof Leaks: A leaking roof can allow water to seep into your ceiling, providing a continuous source of moisture for mould to grow. The water damage often goes unnoticed until mould appears on the ceiling.

  4. Hidden Leaks: Sometimes, plumbing pipes running through ceilings or walls can leak unnoticed, causing moisture to build up. This can lead to mould growth in areas that may not be immediately visible.

How to Get Rid of Mould on Ceiling

Removing mould from your ceiling requires a strategic approach. You need to address both the mould itself and the moisture issue that caused it. Here are the key steps for effectively getting rid of mould on your ceiling:

1. Gather the Right Cleaning Supplies

Before you start cleaning, make sure you have the right supplies to safely remove the mould. You’ll need:

  • A cleaning solution (such as a mix of bleach and water, white vinegar, or specialised mould cleaner)

  • A scrub brush or sponge

  • Rubber gloves, a mask, and protective eyewear (to avoid inhaling mould spores)

  • A step ladder or sturdy stool

  • A bucket and clean cloths for wiping down surfaces

2. Clean the Mouldy Area

Once you have your supplies, follow these steps:

  • Ventilate the Area: Open windows and doors to allow fresh air to circulate, helping to reduce moisture levels.

  • Prepare the Cleaning Solution: If you’re using bleach, mix one part bleach with three parts water in a spray bottle. Alternatively, use a mixture of white vinegar and water (in equal parts) for a more eco-friendly solution.

  • Apply the Solution: Spray the mouldy area generously with your chosen cleaning solution. Let it sit for about 15-20 minutes to kill the mould spores.

  • Scrub the Ceiling: Using a scrub brush or sponge, gently scrub the affected area. Be sure to work carefully to avoid damaging the ceiling surface. For tough spots, you may need to repeat the process.

  • Wipe Clean: Once the mould is gone, wipe the ceiling with a clean, damp cloth to remove any remaining cleaning solution and debris.

3. Dry the Ceiling Thoroughly

After cleaning, it’s important to dry the ceiling completely to prevent further mould growth. You can use a fan or dehumidifier to help speed up the drying process. A dry ceiling is less likely to become a breeding ground for mould in the future.

4. Fix the Underlying Moisture Problem

If you don’t address the cause of the mould, it’s likely to return. Here’s how you can prevent future mould growth:

  • Improve Ventilation: Ensure that areas like bathrooms and kitchens have proper ventilation. Install exhaust fans or open windows during and after activities that produce moisture.

  • Repair Leaks: If you discover a roof leak or hidden pipe leak, fix it as soon as possible. Consider having a professional inspect your roof and plumbing if you suspect underlying issues.

  • Use a Dehumidifier: In areas like basements or attics where moisture tends to accumulate, a dehumidifier can help reduce humidity levels and prevent mould from taking hold.

5. Consider Using Mould-Resistant Paint

Once you’ve cleaned and dried the area, you might want to apply mould-resistant paint to the ceiling. This type of paint helps prevent mould growth by creating a barrier against moisture.

CauseDescriptionRisk Areas
CondensationHumidity from showers, cooking, or drying clothes indoors.Bathrooms, kitchens
LeaksRoof damage, burst pipes, or faulty plumbing.Attics, ceiling corners
Poor VentilationLack of airflow traps moisture.Closed rooms, basements

Step-by-Step Mould Removal Methods

Natural vs. Chemical Solutions Comparison

MethodIngredientsProsCons
Vinegar SolutionWhite vinegar + waterEco-friendly, non-toxicSlower for severe mould
Bleach MixBleach + waterQuick resultsHarsh fumes may damage paint
Baking Soda PasteBaking soda + waterScrubs stains gentlyRequires multiple uses

Preventing Ceiling Mould: Long-Term Strategies

Prevention TipAction RequiredBenefit
Improve VentilationInstall exhaust fans or dehumidifiersReduces humidity by 40-50%
Fix Leaks PromptlyInspect roofs/pipes quarterlyPrevents water buildup
Use Anti-Mould PaintApply mould-resistant primerBlocks spore growth for 5+ years

FAQs About Ceiling Mould

QuestionAnswer
Is bleach safe for painted ceilings?Test a small area first—bleach may discolour the paint.
Can I paint over mould?No! Always clean mould before painting.
How long does vinegar take to kill mould?1 hour for small patches; repeat for stubborn growth.

When to Call a Professional

  • The mould covers over 10 square feet.
  • Recurring mould despite cleaning.
  • Suspected hidden leaks or structural damage.

Final Tips

For severe cases, pair cleaning with a HEPA air purifier to remove airborne spores. Bookmark this guide for quick reference!


How to Get Rid of Mould on Ceiling:

Facebook

Home page 


The Ultimate Guide to Achieving a Perfect Clean 0896103281

Perfect Clean: Tips for a Spotless Home

A clean home is more than just a visually appealing space; it’s a place of comfort, relaxation, and well-being. But what exactly does it mean to have a perfect clean? It’s not just about dust-free surfaces or sparkling floors. A perfect clean involves a comprehensive approach that addresses every aspect of cleanliness, from organization to sanitation, and it plays a significant role in maintaining a healthy home environment.

In this guide, we’ll break down how to achieve a perfect clean in your home with expert tips, tricks, and eco-friendly strategies.

What Does “Perfect Clean” Really Mean?

When we think of a perfect clean, we often picture a home that looks pristine from top to bottom. But a perfect clean goes beyond appearances. It’s about creating a space that is not only visually spotless but also free from bacteria, allergens, and pollutants. A true perfect clean is about maintaining hygiene, creating a healthy environment, and ensuring everything is organized and easy to manage.

Defining a Truly Clean Space

A perfect clean home should feel refreshing and inviting. It’s about having surfaces that shine, air that feels fresh, and an environment that supports your overall health. This doesn’t mean it has to be sterile like a hospital, but it does mean it’s maintained regularly, and it’s a place where you can truly relax and unwind without being overwhelmed by clutter or dirt.

Why a Perfect Clean Matters for Health and Well-Being

A clean home can directly affect your mental and physical health. A cluttered, dirty environment can cause stress, allergies, and even sleep disturbances. Keeping your space spotless helps reduce the buildup of harmful bacteria, dust mites, mold, and pet dander, which can all trigger respiratory problems and allergies. Additionally, when you have a perfect clean home, you also experience improved mood, reduced anxiety, and greater productivity.

Step-by-Step Guide to Achieving a Perfect Clean

Now that we’ve established why a perfect clean is so important, let’s dive into the steps you need to take to achieve one.

Must-Have Cleaning Supplies and Tools

To get started, it’s essential to have the right tools. Having the best cleaning supplies at your disposal will make the entire process smoother and more effective. Here’s a list of must-have cleaning supplies:

Microfiber cloths – Perfect for dusting and wiping surfaces without leaving streaks.

Vacuum cleaner with HEPA filter – Essential for cleaning carpets, upholstery, and hard-to-reach areas.

All-purpose cleaner – A versatile product for most surfaces in your home.

Disinfecting wipes – Convenient for quickly sanitizing high-touch areas.

Glass cleaner – For streak-free windows, mirrors, and glass surfaces.

Broom and dustpan – Handy for quick sweeps of the floor.

Scrub brush and sponge – Needed for tackling tough stains or grout.

The Best Cleaning Techniques for Every Room

A perfect clean requires attention to detail in every room. Here are some cleaning techniques for specific areas of your home:

Living room: Dust electronics, furniture, and shelves. Use a microfiber cloth to wipe down surfaces. Vacuum or sweep the floors and clean upholstery with a fabric-safe cleaner.

Kitchen: Disinfect countertops, sinks, and cabinet handles. Wipe down appliances like the refrigerator, oven, and microwave. Don’t forget to clean the floors and take out the trash.

Bathrooms: Scrub toilets, sinks, and tubs. Disinfect surfaces such as faucets and light switches. Clean mirrors and wipe down any shelves or counters. Always finish by mopping the floor.

Bedrooms: Dust furniture and make the bed. Clean under the bed and in corners, as dust and dirt often accumulate there. Don’t forget to launder bed linens regularly.

Daily vs. Deep Cleaning: What’s the Difference?

While daily cleaning tasks help maintain a perfect clean environment, deep cleaning requires more effort and attention. Daily cleaning includes tasks like wiping down counters, sweeping floors, and doing dishes. On the other hand, deep cleaning involves a thorough scrub of areas that are often neglected, such as baseboards, behind appliances, and inside cabinets. Aim to deep clean your home at least once a month.

Common Cleaning Mistakes That Prevent a Perfect Clean

Achieving a perfect clean is about more than just using the right tools and techniques—it’s also about avoiding common mistakes. Here are a few mistakes to watch out for:

Overlooked Areas You Need to Clean

There are several areas in the home that are often overlooked during routine cleaning. These include:

Baseboards: Dust and dirt can quickly accumulate along baseboards, leaving your home looking less than perfect.

Behind furniture: It’s easy to forget to clean behind large furniture, but dust and dirt can hide there, affecting your air quality.

Light switches and doorknobs: These high-touch areas are a breeding ground for germs but are often neglected.

Ceiling fans: Dust can settle on ceiling fans, and when turned on, it can spread throughout the room.

Cleaning Products You Should Never Mix

Some cleaning products can be harmful when mixed. For example, combining bleach and ammonia creates a toxic gas that can irritate your respiratory system. Always read the labels of cleaning products to ensure they are compatible and safe to use together.

How to Maintain a Perfectly Clean Home Every Day

Once you’ve achieved a perfect clean, it’s important to keep it that way. Regular maintenance will ensure your home remains fresh, organized, and hygienic.

Quick Daily Cleaning Habits

These daily habits can help you maintain a perfect clean without feeling overwhelmed:

Make your bed as soon as you wake up.

Wipe down kitchen counters and dishes after each meal.

Put away clutter and keep surfaces tidy.

Sweep high-traffic areas like entryways and hallways.

Weekly and Monthly Cleaning Checklists

In addition to daily upkeep, consider setting aside time each week or month to do more in-depth cleaning. Some tasks, such as washing windows, cleaning out the refrigerator, or washing throw rugs, don’t need to be done every day but should be added to your weekly or monthly cleaning schedule.

Eco-Friendly Ways to Achieve a Perfect Clean

You don’t need harsh chemicals to achieve a perfect clean. There are many eco-friendly alternatives that are both effective and gentle on the environment.

Best Natural Cleaning Products

Vinegar: Great for disinfecting and removing odours.

Baking soda: Effective for scrubbing and removing stains.

Lemon: Naturally antibacterial and adds a fresh scent.

Castile soap: A gentle, plant-based soap that can be used for various cleaning tasks.

How to Reduce Toxins While Keeping Your Home Spotless

In addition to using natural cleaning products, consider reducing your reliance on disposable products. Use reusable microfiber cloths instead of paper towels and avoid single-use plastics. Invest in eco-friendly cleaning tools that will last longer and reduce waste.

Final Thoughts: The Secret to Effortless Perfect Cleaning

Achieving a perfect clean doesn’t have to be difficult or time-consuming. By following a few simple tips, maintaining a regular cleaning schedule, and avoiding common mistakes, you can create a space that feels fresh, welcoming, and healthy. Remember, a clean home is not just about appearances—it’s about creating a safe and comfortable environment where you can truly relax and unwind.

With the right tools, techniques, and eco-friendly habits, the perfect clean is well within your reach!


perfect cleaning
perfect cleaning Facebook
After Builders Cleaning Services 0896103281

Why After Builders Cleaning Is Important

When the building process is done, there is only one last step left until you can step into your newly built or renovated home — builders cleaning, whether you plan to move into a residential space or an office, you will want to get rid of construction debris and dust that remains. Renovations that can provide a breath of fresh air to a home or business can also leave behind a hidden cost — Dust, debris, and chemical residue that can linger long after the workmen have left.

Sawdust, nails, and leftovers are the most visible signs of post-construction clutter, but the problem is far more insidious. Smog and dirt get inside vents, dried adhesives leave residues, and tiny dangers such as silica dust, mold spores, and chemical fumes linger in the air, threatening health and indoor air quality.

Because of these, builders cleaning does not just pertain to looks — it is also crucial when it comes to your health, the safety of your investment, and the way your space has the potential to function. Here’s why it’s never a good idea to skip this step:


Healthier Living Environment

Work zones are breeding sites for allergens and irritants. Drywall dust, fiberglass particles, and toxic residues from paints, solvents, or adhesives can remain long after the crew has departed. Without thorough cleaning:

Respiratory Risks

Particles in the air can worsen asthma, allergies, or chronic lung conditions. Silica dust, which is present in concrete and tile work, is a known carcinogen if inhaled over time.

Chemical Exposure

VOCs (volatile organic compounds) from paints, varnishes, and sealants off-gas into your air, causing headaches, dizziness, or long-term health issues.

Preventing Mold

Plaster or grout dries all around, including in the hidden corners where mold can settle happily and multiply if not properly dried and sanitized.

A deep clean snuffs these invisible menaces, making sure that, from day one, your air quality is safe to breathe.


Protect Your Investment

Your new finishes — hardwood floors, marble countertops, or custom cabinetry — deserve to show off. Construction debris is not only unsightly; it is destructive:

Scrapes and Abrasions

The grit that’s present in dust from drywall or concrete works like sandpaper and can dull hardwood floors, laminates or varnished surfaces.

Stained Grout and Tiles

Cement splatters or paint drips leave permanent stains if not removed quickly, necessitating expensive repairs.

Damage to Appliances

Dust build-up in heating, ventilation, and air-conditioning systems, the coils of a refrigerator, and the vents of a dishwasher reduces their efficiency and shortens their lifespan.

Post-renovation builders cleaning protects your materials so your renovation looks — and performs — exactly how you wanted it to for years to come.


Safety for All Occupants

Construction sites are dangerous minefields, long after the work is “complete”:

Tripping Hazards

Loose nails, screws, or bits of wood lurk underfoot, especially in carpets or low-light areas.

Sharp Edges

Shards of glass, exposed wires, or jagged pieces of tile are hazardous to children and pets.

Chemical Residues

Uncured adhesives, solvents, or fumes from paint can cause skin irritation or accidental poisoning if touched or ingested.

A careful clean rids you of these risks and restores your dwelling from a job site to a safe, family-ready home.


Aesthetic Perfection

You’ve poured so much time and money into creating your dream space—don’t let construction dust spoil it. Grimy baseboards, dust-coated light fixtures, and smeared windows take away from the beauty of your home. Professional cleaners:

Restore Sparkle to Surfaces

Clean paint overspray and adhesive films from glass and mirrors so they sparkle again.

Revive Walls and Ceilings

Banish cobwebs, dust trails, and scuff marks to revive walls and ceilings.

Maintain Pristine Floors

Keep floors spotless, whether you’re vacuuming carpets to extract ground-in dirt or buffing hard surfaces to a streak-free shine.

The result? A picture-perfect space that aligns with what your mood board looked like when you started.


Peace of Mind

These are stressful enough without worrying about mess hanging around.

Time-Saving Efficiency

The pros do the work promptly, using industrial-grade equipment, so you can spend your time moving in or decorating.

Compliance Assurance

Post-construction cleaning helps ensure that rental properties or commercial spaces meet the necessary health and safety standards.

Move-In Readiness

When you’re ready to begin life in your new space, there is no “settling for good enough.”


The Bottom Line

Builders clean is not a luxury—yet another touch to the whole experience — it`s the final and therefore the most important phase of your project. By addressing masked hazards and preserving finishes — as well as taking your space to its highest potential — this step makes sure the success of your renovation is not tarnished by avoidable shortfalls. Whether you’re a homeowner, a landlord, or a business owner, skipping it could jeopardize your health, safety, and the durability of your investment. Don’t merely do the job — do the job right.

Pro Tip: Combine your cleaning with an air quality test or duct cleaning for added peace of mind!


after builders cleaning

Facebook
Home page

Open chat
Hello this is Remy👋
Can we help you?