Carpet cleaning cork
Professional Carpet Cleaning in Cork, from Residential to Commercial, from the Advanced Carpet Cleaning Systems
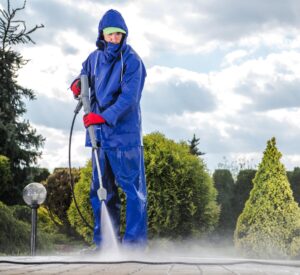
Professional Carpet Cleaning Services in Cork
Keeping your carpets clean goes beyond aesthetics—it’s about maintaining a healthy home. Over time, carpets collect dust, allergens, and stubborn stains that regular vacuuming can’t remove. That’s where our expert carpet cleaning services in Cork come in!
We use advanced steam cleaning, eco-friendly solutions, and powerful extraction techniques to deep clean carpets, remove odors, and restore their freshness. Whether you’re dealing with pet stains, food spills, or general wear and tear, our skilled technicians ensure a thorough and safe cleaning process.
Why Choose Us?
Professional deep cleaning for homes & businesses
Fast-drying, non-toxic cleaning solutions
Effective stain & odor removal
Affordable pricing with no hidden costs
Transform your carpets with Cork’s trusted cleaning experts. Contact us today for a free quote!
Table of Contents
- How Clean Carpets Make the Modern World Go Round
- Airflex Storm Machines: Industry-leading Carpet Cleaning Technologies
- Steam Cleaning: The Holy Grail of Deep Cleaning
- The Ultimate Guide to Removing Food Stains: 15 Recipes with Solutions
- ShockGuard: Technology to Sicher Stains Advanced
- How Much Does Carpet Cleaning Cost in Limerick? Domestic & Commercial
- Business Carpet Cleaning: Getting Help in Cork
- How To Select The Right Carpet Cleaning Service
- General Protection: Ensuring Cleanliness of Carpets
- ArticlesTransformations in Residential & Commercial Spaces
- The Environmental Impact of Your Cleaning Habits: Tips for Sustainable Cleaning
- Risks and Rewards of DIY vs. Professional Cleaning
- How Professional Carpet Cleaning Can Help You Stay Healthy
- Frequently Asked Questions and Answers
1. The Soiled and Desaturated Era of the Modern Carpet
When it comes to comfort, aesthetics, or even indoor air quality, carpets are an integral part. However, they also ensnare dirt, allergens and pathogens, which creates threats to health and longevity. Carpets have specific challenges in Cork’s humid environment:
- Allergen Accumulation: Dust mites, pollen, and pet dander work their way into the deep fibers, triggering allergies and asthma.
- Stain susceptibility: tea, coffee, wine, mud, pet accidents, etc.
- Stained Smells: Mold and ground-in odors thrive in the humid air of coastal Cork.
Health Impact:
According to a 2025 EPA study, carpets can store up to 200,000 bacteria per square inch.
Professional cleaning decreases allergens by 80%, which increases respiratory health.
Economic Impact:
Carpet cleaning can increase carpet life by 5–10 years, thus saving carpet replacement.
2. NEW Subscription: Airflex Storm Machines Advanced Carpet Cleaning Technologies
Why Is Airflex Storm Different?
The Airflex Storm is an innovative piece of equipment that is efficient and environmentally friendly:
- Heated Clean: This boils up to 120 °C, which would melt the grease and kill bacteria.
- Low Moisture Injection: Consumes 80% less water than traditional steam cleaners.
- Fast Drying: The carpets are dry within 2–3 hours, so it doesn’t hamper much.
Technical Specifications:
- Motor Power 1500W — removes 99% of dirt, mud and humidity.
- Portability: Small footprint navigates tight spaces in Cork’s historic homes and offices.
- Eco Mode: Lowers energy usage by 30% while complementing Cork’s sustainability efforts.
Case Study:
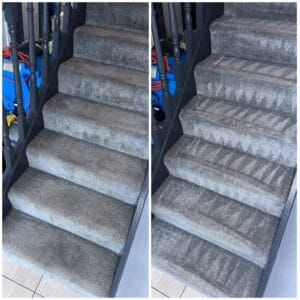
Cork Café Before & After: A busy café on Oliver Plunkett Street achieved a 70% reduction in stains following bi-monthly Airflex Storm cleans. Drying times of under three hours enabled same-day reopening.
6. Limerick Carpet Cleaning Costs: Residential and Commercial
Residential Pricing
| Service | Price Range (€) | Details |
|---|---|---|
| Single Room Cleaning | €50–€90 | Pre-treatment & ShockGuard included. |
| Pet Stain Package | €120–€200 | Enzymatic treatment + odor removal. |
| Deep-Clean Whole House | €200–€500 | 3+ rooms: up to €50 off. |
Commercial Pricing
| Service | Price (€) | Details |
|---|---|---|
| Office Cleaners | €150–€400 | Evening/weekend to avoid downtime. |
| Store cleaning systems | €200–€600 | Focus on high-traffic areas (entryways, aisles) |
| Hospitality Cleans… | €300–€1,000+ | Custom plans based on a hotel or B&B. |
14. FAQs: What You Need to Know, in Expert Terms
Commercial carpets are relatively simple to clean; periodic vacuuming and cleaning every 6–12 months will keep them from looking worn. **
A: Every 3–6 months for offices; monthly for high-traffic retail.
Q: Are flood-damaged carpets recoverable?
A: Yes, through the use of antimicrobial treatments and rapid drying (<24 hours).
Q: Is it safe to dry-clean wool carpets?
A: Yes, but with pH-neutral solutions and controlled moisture.
Final Thoughts
Professional carpet cleaning is an investment in health, aesthetics and longevity. Cork’s leading technologies, such as Airflex Storm and ShockGuard, mean homeowners and businesses are now able to enjoy cleaner and fresher-smelling carpets all year round.
Are You Prepared to Change Your Environment? Call us today to have a custom quote!